Description
Boat Hull Numbers – Boat Identification Numbers
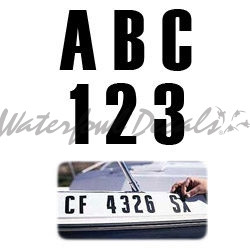
Complete set of Boat – Boat Hull Numbers – Boat Identification Numbers
Registration numbers for both sides of your boat. Available in a variety of
colors. They measure approximately 3.0″ tall x 30″ long.
Made of quality outdoor vinyl these
Boat Registration Numbers will last for
years!
These are boat hull numbers are a best seller and
will complete your boat and get it on the water.
These Boat Identification Numbers come as one piece and there is no need to try and line-up each individual number, simple follow the directions below.
With the largest selection of
outdoor related decals / stickers Made in the USA you can’t go wrong with our
selection!
Directions: Place decal on a
clean, non-porous surface. Peel paper
backing from decal and apply to surface. Smooth the decal with Squeegee to
remove air bubbles, then peel away masking.
Made in the USA
Please note that we cannot accept returns on custom items. So, please be sure that your numbers are correct on your order.
Installation Temperature: make sure that the surface and air temperature is above 10° Celsius. Moistness above 90% can likewise keep decals from following appropriately.
Materials Required: Decal, squeegee, veiling paper , blade or scissors, discretionary liquid (light lathery water) for mammoth decals, tape .
Installation Directions:
1) Clean and found out the surface as portrayed previously. make sure that your decal fits the planet by holding your decal against the surface. On the off chance that essential, utilize a tape to make sure the decal is that the place you’d like it .
2) Holding the decal where you would possibly want it introduced, safely tape it to the surface at the halfway point either on A level plane or vertically. (For this example, we picked somewhat not exactly most of the way on account of the arranging of this particular decal). counting on your decal size you’ll got the chance to tape the decal at the corners or utilize 2 bits of tape at the middle. the middle bits of tape will become your pivot point.
3) From absolute bottom (or top) corner of the decal, tenderly strip the exchange tape and decal away from the wax backing paper. Strip decal at a foothold more noteworthy than 160° until you reach the pivot point. Utilizing your blade, delicately cut the wax backing paper along the pivot point. Evacuate yet spare this piece paper .
4) just in case you’re utilizing an application liquid, now softly splash the essential an outsized portion of the surface where the decal is to be introduced.
5) While keeping the decal instructed with one hand, delicately utilize the squeegee to press the decal to the surface. Start at the hing point and work your way towards the external edges.
6) Rehash stages 3-5 for the contrary an outsized portion of the decal.
7) Utilizing the squeegee, extending from the focus of the decal towards the surface , expel any staying fluid, air pockets or wrinkles.
8) Beginning at the corner, strip the foremost elevated layer concealing paper away from the surface, again it’s ideal to aim to the present at some extent more noteworthy than 160°. within the event that any vinyl doesn’t stick with the surface delicately place it backtrack with the veiling and press it during more.
9) within the event that you simply notice any air pockets or wrinkles utilize the paper (spared from prior) lay it on the decal and utilize the squeegee to squeeze bubbles and wrinkles out. The paper keeps your decal from being damaged. within the event that air bubbles remain you’ll utilize alittle pin to pop them and press the influenced region to the surface.


